
Design system implementation: A step-by-step guide
Ready to roll out a design system? Learn the key steps for design system implementation, from auditing components to driving adoption, and how Figma can help.
Skip to main content
Design basics
All your design work, in one place.
If you’ve already set up design tokens, you’ve solved the problem of naming your design decisions. But once those tokens have to move across more than one team, more than one platform, or through a codebase that’s bloated beyond what any single person can track, you’ve hit a second problem. Design token architecture is the answer to it.
Tokens tell you what a value is. Architecture tells you how that value gets structured, scoped, and shipped to everyone who needs it, without breaking whenever something changes. This matters most for products shipping across Web, iOS, and Android at once, because each platform needs the same design decision translated into its own syntax.
With contemporary AI coding tools, a prompt can generate a new component or edit a token value in seconds. Your pipeline needs to catch and propagate these changes just as fast, or else you’ll spend more time cleaning up drift than you saved.
A flat list of tokens can’t keep up with that pace, but a structured one can.
Read on to learn:
Design tokens store a single design decision, like a color, a spacing amount, or a font size, as a reusable value. (For example, color.blue.600, spacing.16, or font.size.300.) Instead of typing that hex code or pixel number into a dozen different files, one token holds it, and every component that references the token updates when it changes.
Design token architecture is the layer above: how those values get organized, and how they travel from a design file into production code.
No single token decides much on its own. The structural calls—like how many layers your system has, which tokens stay internal, and how updates propagate—are what decide whether your token system holds up as it grows or turns into a maintenance burden.
Pro tip: If you haven’t set up tokens yet, start with our guide to design tokens, which covers building them in Figma Design with variables.
A flat list of tokens works fine for a while, but as a system grows past a handful of contributors, teams run into the kinds of design system scaling problems that show up in components and libraries, too.
Shipping on more than one platform is the most common trigger for implementing token architecture. A color token that renders as a hex code in Figma Design has to become a color resource in Swift, another in Android, and a CSS custom property on the Web. Without a structured way to translate and distribute that value, someone ends up hand-copying it into three codebases, and the copies drift apart within a few sprints.
When several product teams can add or edit design system tokens with no shared rules about scope or layering, you end up with duplicate tokens that mean the same thing, or identical tokens that mean different things depending on who touched them last.
Design that keeps moving is the third pressure point. For example, a rebrand or a dark mode rollout means finding and fixing every affected value by hand in a flat system, instead of propagating automatically from one source of truth.
Most token systems that scale well use three layers:
How many of those layers does your team actually need?
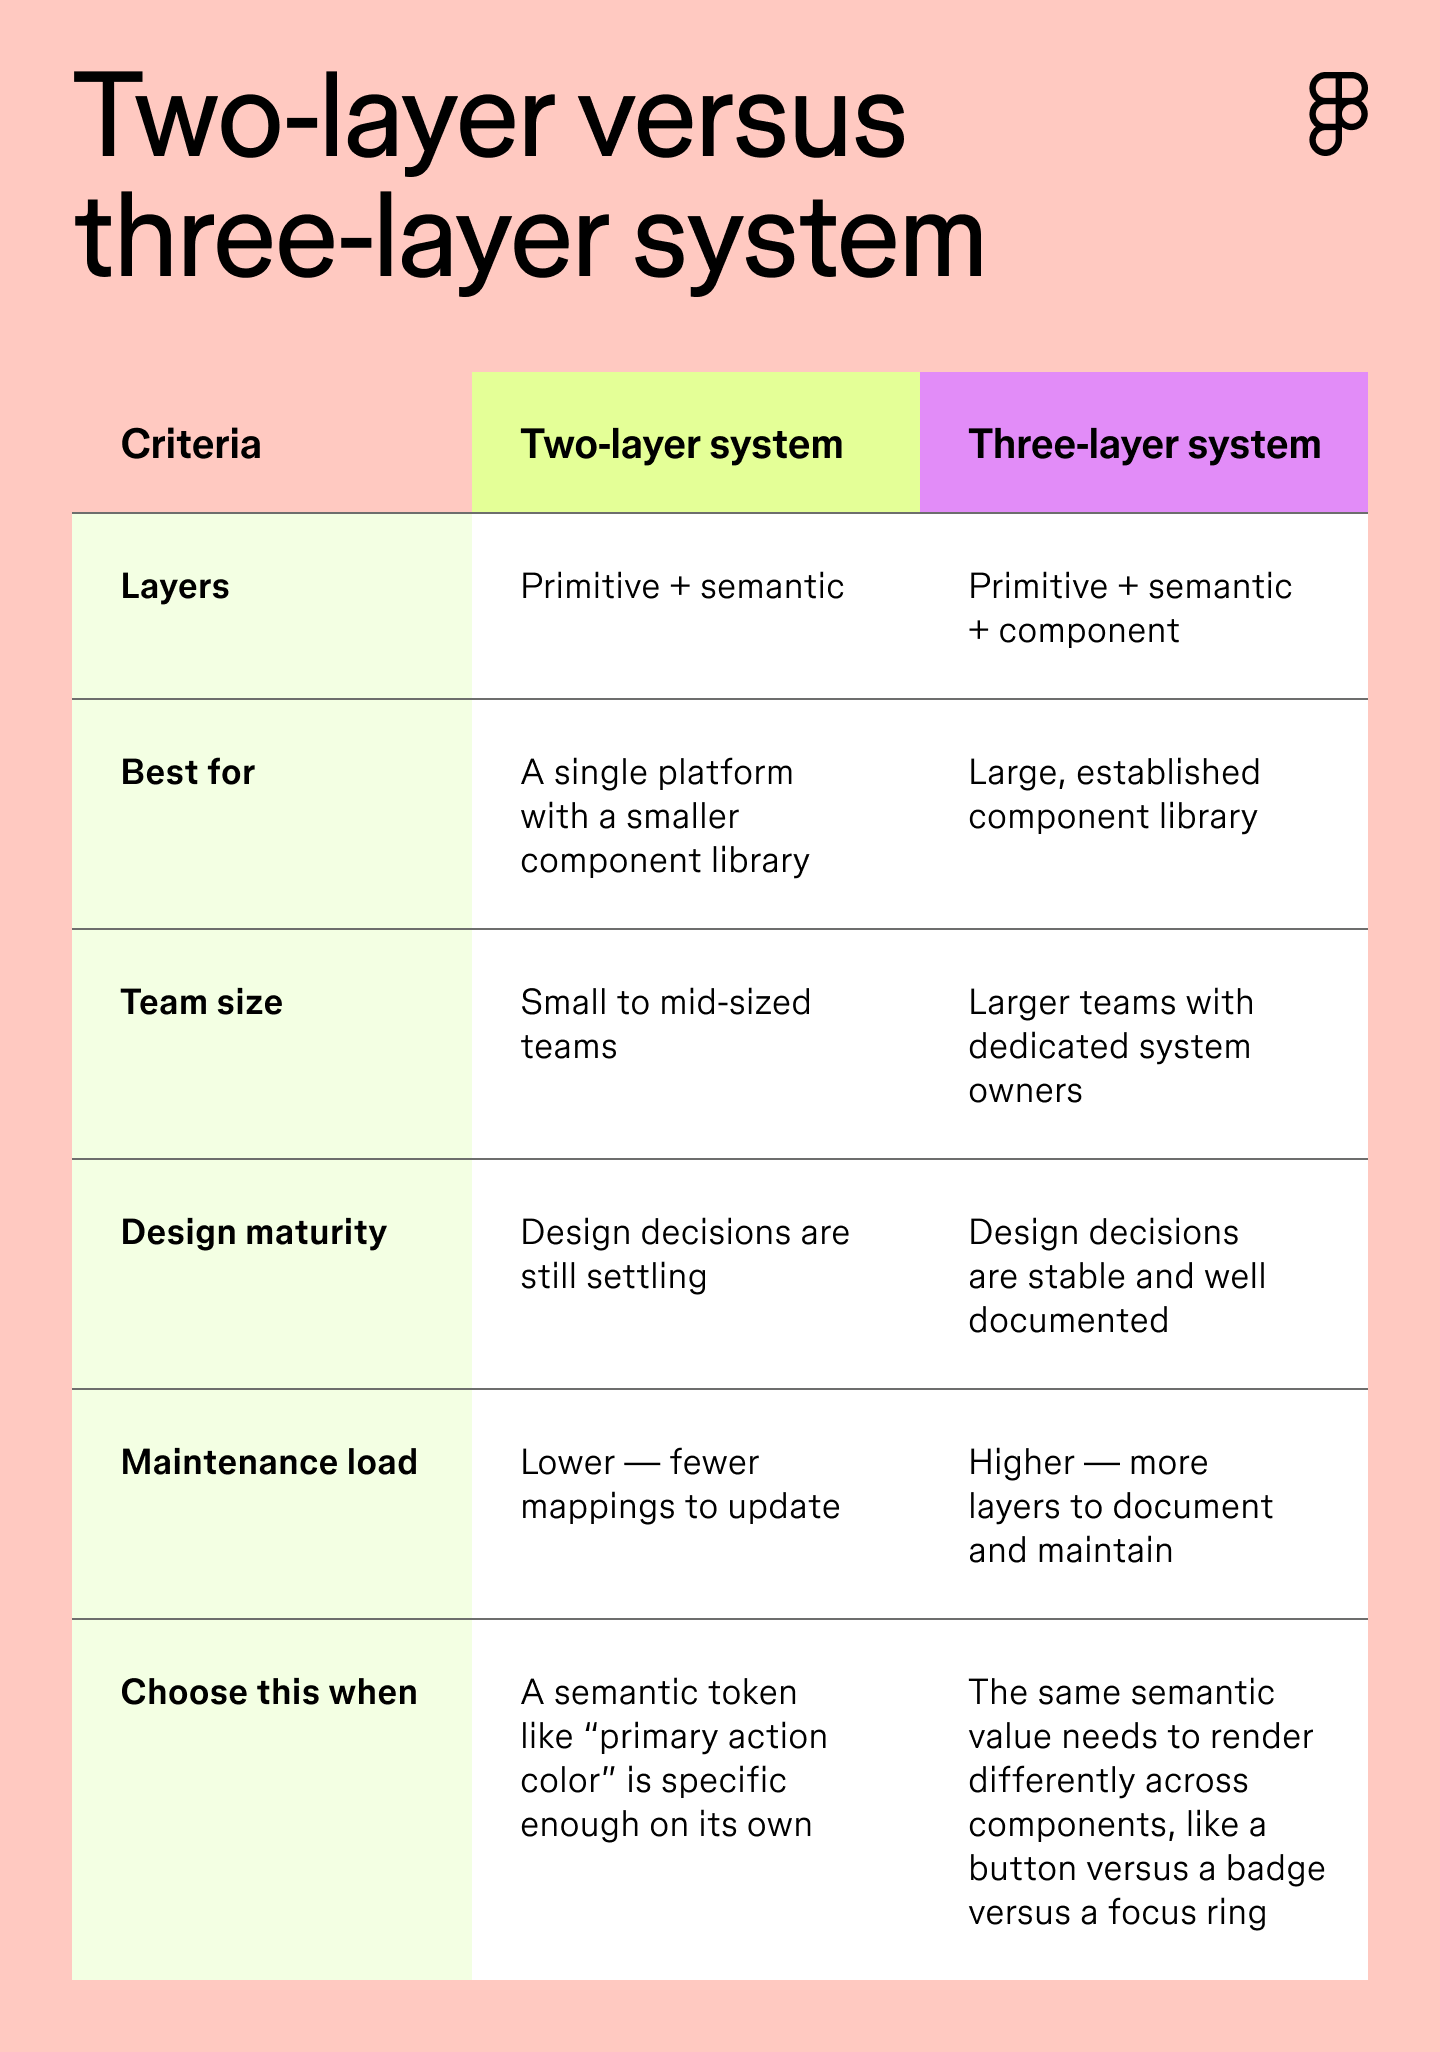
Two layers, primitive and semantic, are enough for a lot of teams. If your product runs on a single platform with a modest component library, a component layer just means maintaining another set of mappings for precision you rarely need. A semantic token that tells a button to “use the primary action color” is usually specific enough on its own.
Three layers make sense once your component library gets big enough that a semantic token outgrows what a semantic token can specify, like when “primary” needs to render differently on a button, a badge, and a focus ring. A third layer also helps when your design decisions are still settling, since it lets you adjust one component’s mapping without touching the semantic token that everything else relies on.
Every new layer is another thing to maintain, document, and explain to a new teammate. Only add one when you can justify it.
Not every token needs to reach every team. Your primitive layer can stay internal to the design team, while the semantic or decision layer ships to everyone consuming your library.
Hiding primitives keeps the published library smaller and quieter. It also means fewer decisions land on a developer’s plate. If they only see color.background.primary instead of 12 shades of blue, then there’s only one reasonable choice to make. Keeping primitives private also gives your design team room to change an underlying value (like swapping which blue defines “primary”) without every team needing to know.
The test: if a token represents a decision someone downstream needs to make, publish it. If it’s a raw value someone downstream would only ever reference indirectly, keep it private. Figma builds this in as a real setting rather than a habit you have to remember. Local variables have a hiddenFromPublishing property that keeps them out of a published library while your semantic tokens still reference them underneath.
Dev Mode connects design and code, so developers can inspect the exact token names and values behind a design without asking.
Once architecture is settled, distribution is the next step. How will tokens get from a design file into the codebases that use them? The answer is design system automation, and these four steps build a working pipeline.
Pro tip: It’s also worth teaching your AI tools the rules of the system directly. A Claude Skill for your design system can encode your token taxonomy so AI agents reach for the right variable instead of a hardcoded value.
Before automating anything, decide where your tokens live. For most teams, that’s a git repository, not a design file.
Once tokens are checked into version control, every change gets a diff, a history, and an owner, which gives you something stable to build the rest of your pipeline on.
This also changes how your design tool fits in. Figma Design becomes the interface for proposing and reviewing token changes, while the values themselves sync out to a repository that build tools, CI pipelines, and other codebases can read directly.
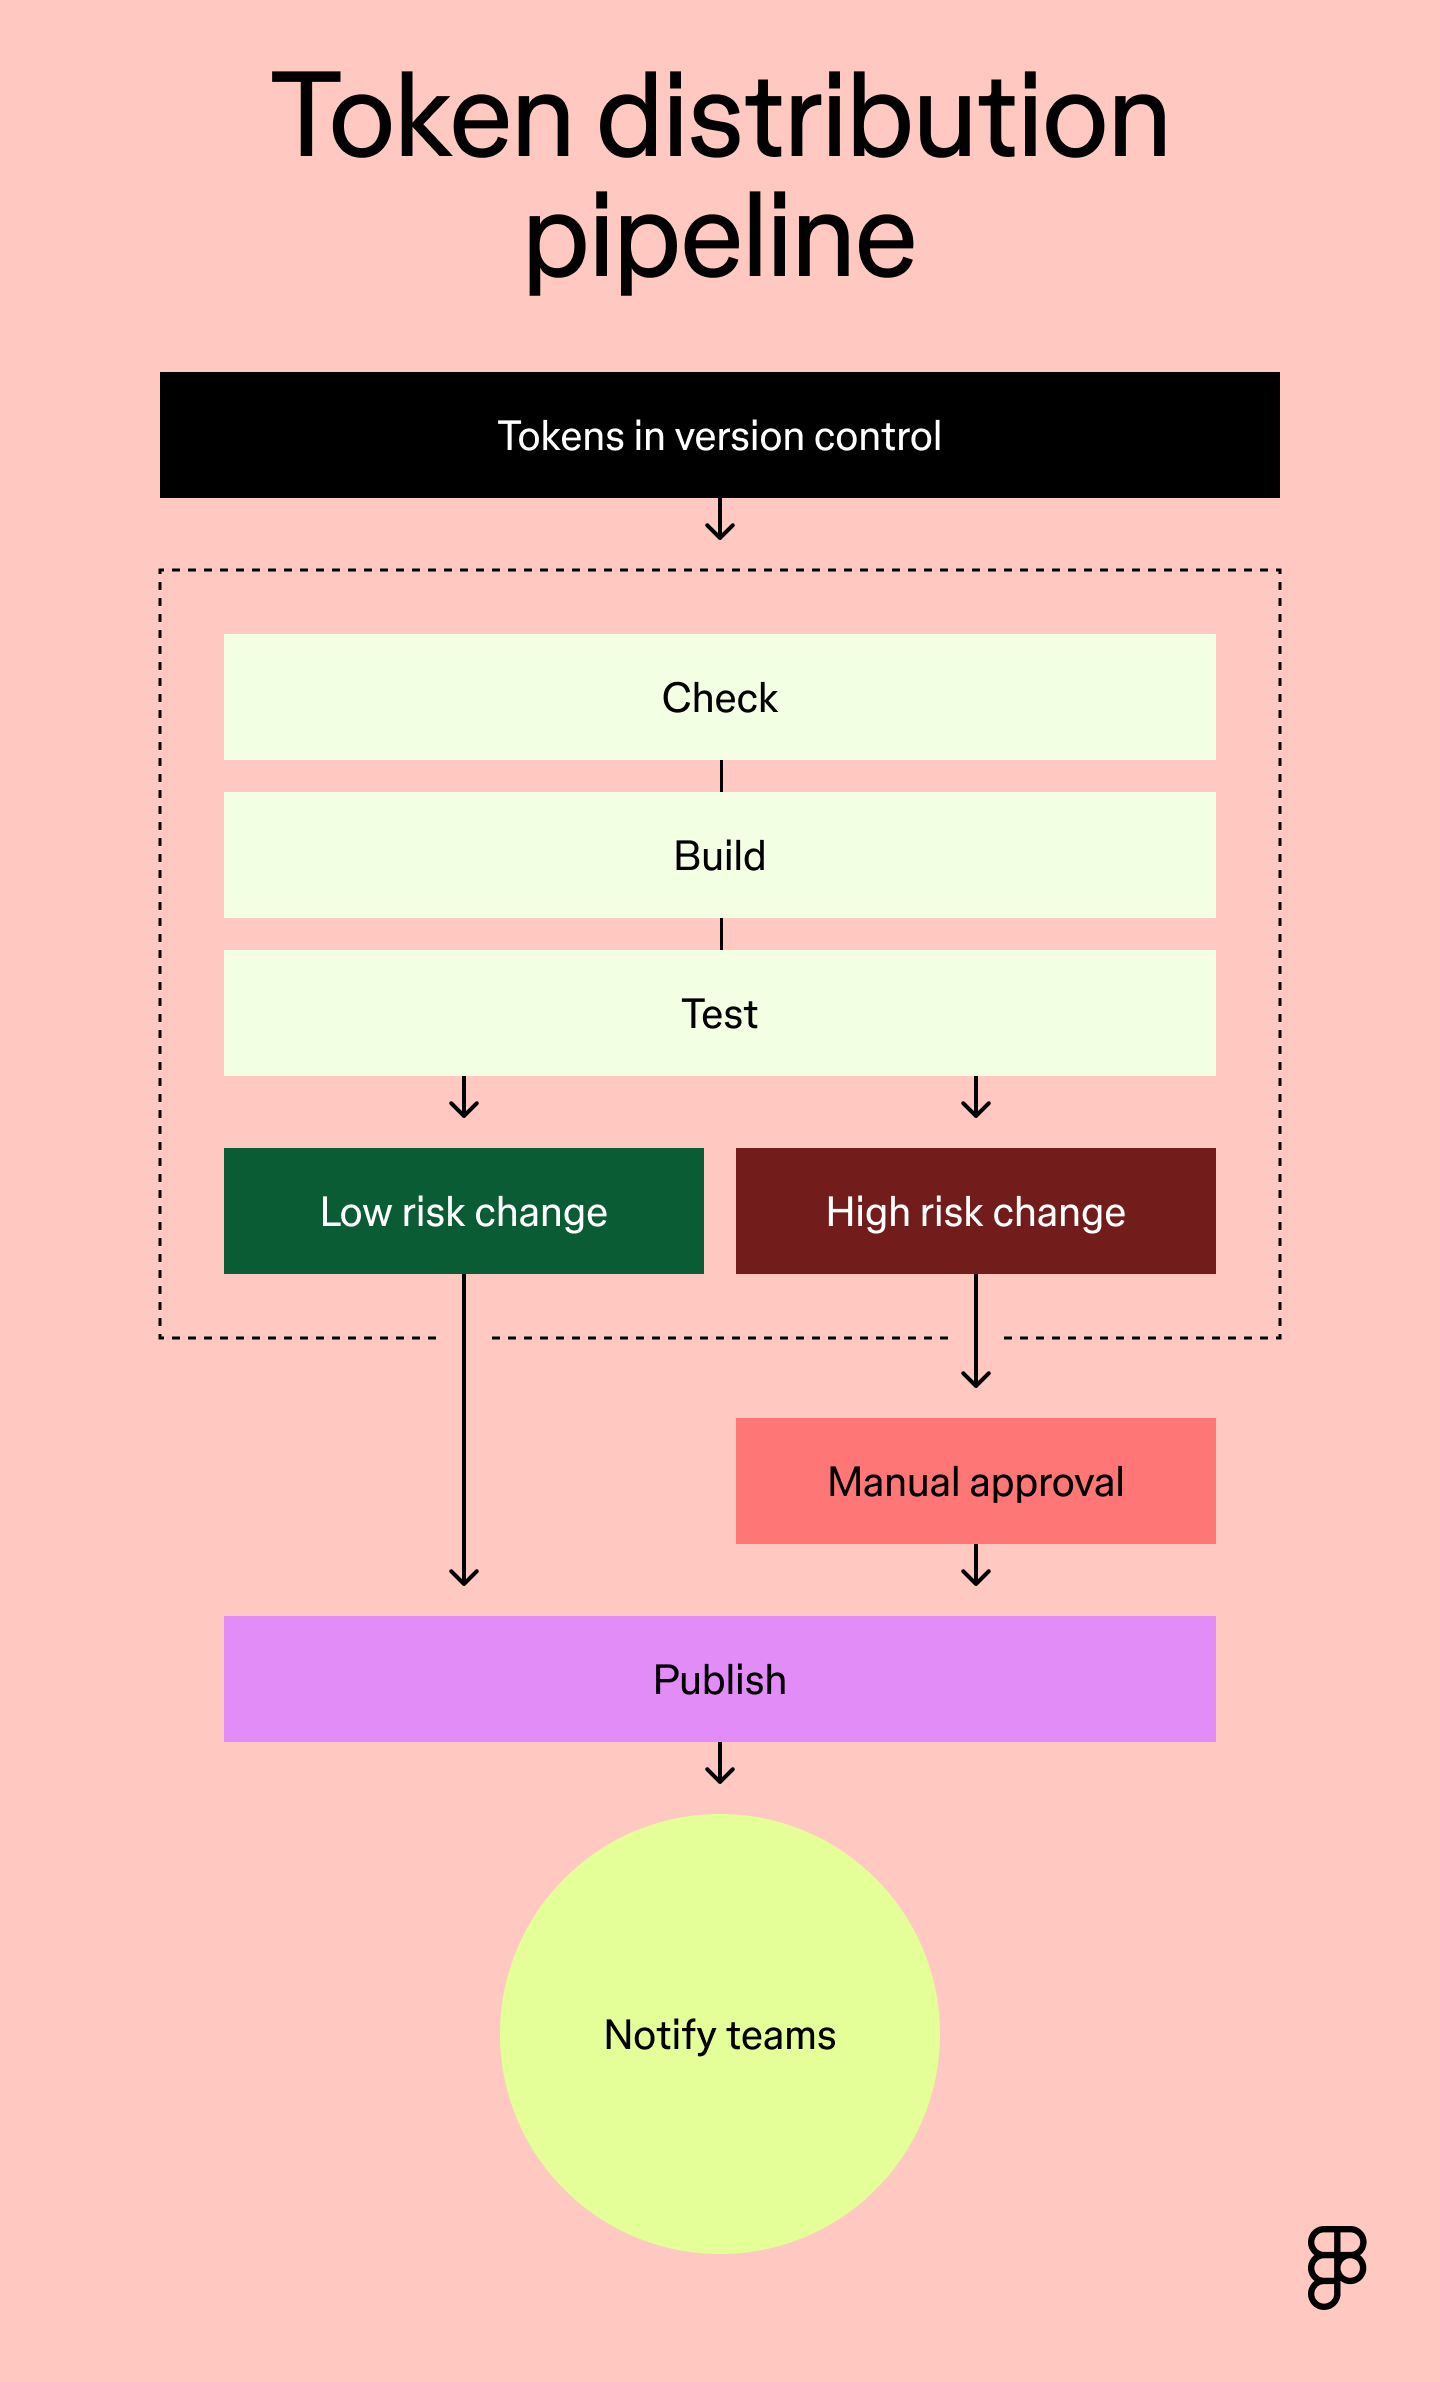
With tokens in version control, you can automate the loop that ships changes. For example, check what changed, build the platform-specific formats each codebase needs, test that nothing broke, and publish the result. The specific tools depend on your stack, but the shape of the loop stays the same across platforms.
This is where Dev Mode and Code Connect earn their place in the chain, and it’s a big part of what Figma design system automation looks like in practice. Dev Mode surfaces the token names and values a developer needs while inspecting a design, and Code Connect links Figma components to their real, coded equivalents, so the snippet a developer sees matches up with what ships.
AI coding tools plug into that same chain, too. The Figma MCP server hands an AI agent the exact token and code context it needs, instead of leaving it to guesswork.
Not every token change should ship automatically. For example, a typo fix in a spacing value is low-risk, but a change to your primary brand color touches every screen in your product. The latter is major enough to warrant human review.
Most engineering teams already run code through pull requests before it ships. Route token changes through that same process: someone has to sign off before a change merges. Preview environments work, too, letting reviewers see the change rendered across real screens before it goes live. Adding a review step here targets the moment risk is highest, without slowing down every other change.
This step gets skipped most often, and it causes the most downstream confusion. A token can update cleanly and publish without a hitch, and a team can still ship a bug because nobody told them the value they depend on had changed.
Notification doesn’t need to be complicated. A message in your team’s chat, a changelog entry, an automated comment on affected pull requests—any of them work. What matters most is that the update reaches the people using the token before they notice something looks off in production.
Plenty of teams run a flat token list for years without any real problems. Adding architecture you don’t need just leaves you with more to maintain.
A few conditions tip the scale. Here’s when structure earns its keep:
Design token architecture is what keeps a token system flexible as it grows. Layering, scoping, and automation decisions are what decide whether tokens hold up across teams and platforms or slowly fall out of sync.
Get it right, and a value stays the same value from the design file to the shipped product.
Here’s how to put it all together:
Figma Design is where teams come together to explore, iterate, and bring digital products to life.
Ready to roll out a design system? Learn the key steps for design system implementation, from auditing components to driving adoption, and how Figma can help.

Learn how automated UI handoff works, where manual processes break down at scale, and how Figma’s Dev Mode and Code Connect build a connected workflow.

Avoid common design system scaling mistakes. Learn how to transition from a static library to a product infrastructure that aligns design and code at scale.


Design operations help teams scale without losing quality or speed. Learn what DesignOps is, who does it, and when your team needs it.

Learn what MCP for designers actually does, how Figma’s MCP server changes design-to-dev workflows, and which MCP servers you should be using today.

The software development lifecycle phases guide every product from idea to launch. Learn each SDLC phase and how AI is changing the way teams build.
Build faster with Figma's agent